How To Vent A Tankless Water Heater – The Truth Reveals
Have you recently installed a tankless water heater to help lower your energy costs? Congratulations on making the smart choice! While these popular in-demand appliances offer multiple benefits, one of the most important things to be aware of is proper ventilation. The good news is that it’s fairly easy to vent a tankless water heater and if done correctly, can save you time and money down the road while helping ensure that your home remains safe.
In this blog post, we’ll discuss everything you need to know about how to vent a tankless water heater. From selecting the right product materials and location to understanding what type of ventilation is recommended; we’ve got you covered! So if you want to enjoy all the benefits that come with having a well-vented tankless water heater, read on!
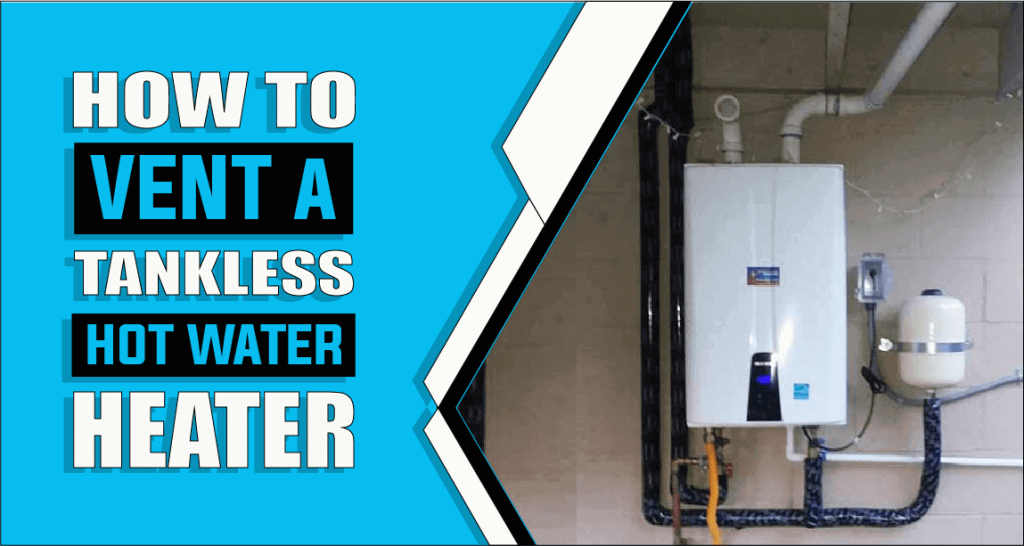
Let’s look at how to vent a tankless water heater.
Venting a tankless water heater is an important step in the installation process, as it is responsible for allowing hot exhaust gases to escape from the unit. Properly venting your tankless water heater helps to ensure its safe and efficient operation. There are two main types of tankless water heater vents: direct vents and power vents. Direct vent units require two exhaust vents on either side of the unit, while a power vent requires only one that goes to the outside wall.
Depending on your particular model, you may also need additional parts such as vent pipe and elbows for proper setup. The most common material used for vent piping is PVC or CPVC, although other materials such as stainless steel may be acceptable depending on the manufacturer’s requirements. When installing a direct vent system, the pipe should run vertically up through the ceiling or roof, whereas with a power vented system it can be run horizontally towards an outside wall or through a chimney. It’s also important to keep in mind that all vents must be properly sealed with caulking around their edges to prevent leaks and moisture buildup inside your home.
Once installed, you should inspect your tankless water heater regularly to ensure that all vents are clear of obstruction and functioning properly. By taking these steps and following the instructions provided by your manufacturer, you can help ensure that your tankless water heater will safely provide reliable hot water for years to come.
What is a Tankless Water Heater?
A tankless water heater is an energy-efficient and space-saving alternative to traditional tank-style units. Unlike tank models which store a large amount of hot water, tankless water heaters only heat the amount of water needed when it is requested. This helps to reduce both energy bills and emissions, as well as providing an endless supply of hot water.
Any tankless water heating unit must be properly vented by local codes since improper installation could result in costly repairs or even the destruction of property. It’s recommended that tankless units be installed by a qualified professional for the best results and safety. Properly installing and maintaining vents can also increase energy efficiency since heated air will not become trapped in the system and will be quickly pushed outdoors where it doesn’t need to be heated again.
Overall, proper venting is an essential component of any tankless water heating system for it to function efficiently and safely without risking damage to your property or putting your family at risk of harm from combustible fumes.
Benefits of Venting a Tankless Water Heater
Unlock the potential of a tankless water heater with venting. Enjoy on-demand hot showers, and save space and energy through efficient heating, all these benefits await you!
1: Energy Efficiency and Lower Energy Bills
Venting a tankless water heater can lead to greater energy efficiency in your home. Tankless water heaters can provide hot water on demand, meaning they don’t need to reheat stored water when needed. This can lead to lower utility bills as you will not be paying for the electricity used to keep stored hot water warm when not needed.
2: Longer-Lasting Hot Water Supply
Since tankless water heaters only begin heating when there is a demand for hot water, they can deliver an unlimited supply of hot water without any “cold spots”. This allows even large households with multiple bathrooms and showers to enjoy consistent hot showers and baths without interruption or running out of hot water prematurely.
3: Space Savings
Traditional tank-style units have bulky tanks that require additional space for installation and operation. With a venting tankless unit, you don’t have to worry about finding extra space for the bulky tanks or about where it needs to be installed for optimal performance.
4: Cost Savings
Installing a venting tankless system can save you money in the long run due to its high-efficiency rating, which means that less energy is wasted keeping the stored hot water at a temperature when it isn’t being used. A tankless system also requires less maintenance than a traditional tank-style heater, reducing overall labor costs over time as well as eliminating the need for frequent replacement parts due to wear and tear from using larger storage tanks over time.
4: Regulate Pressure Within the Unit
Venting also helps to regulate the pressure within the unit so it can operate safely at optimal levels. Without proper venting, the air is trapped in the system and can cause high levels of pressure which can lead to premature failure or other malfunctions. Additionally, if there’s inadequate ventilation around the unit, dangerous fumes may leak into your home or business causing potential health hazards.
5: Safe and Efficient Operation
By venting tankless water heater units properly and by local codes, you can ensure that your tankless unit is safely and efficiently operating. This helps to reduce the risk of potential fire hazards as well as make sure that your tankless system is running at peak performance levels for longer-lasting results and better energy efficiency.
6: Venting Allows the Safe Disposal of Dangerous Gases
Venting is important for a tankless water heater because it allows the unit to safely dispose of dangerous gases, such as carbon monoxide, exhaust fumes, and other combustible gases, that are produced during the combustion process when using natural gas or propane as the fuel source.
Materials Recommended for Venting a Tankless Water Heater
When venting a tankless water heater, you will need several parts to properly install the unit. Here are some recommended materials:
1: Stainless steel Vent Pipes
When installing a tankless water heater, all of these components must be made of stainless steel with double-walled construction to ensure their durability and resistance to corrosion. The stainless steel vent pipe should have an internal diameter of at least 3 inches and should not exceed 8 feet in length when installed.
2: Insulated Vent Pipes
If installing a tankless water heater in areas where temperatures may drop below freezing, it is recommended to use insulated vent pipes for optimal performance and safety.
3: Adapter or Coupling
The adapter or coupling must be able to make a tight seal between the water heater’s vent and the stainless steel vent pipe.
4: Wall thimbles
Wall thimbles are also needed to pass heated exhaust through exterior walls without damaging them. Wall thimbles usually come with factory pre-drilled holes so they can easily be installed within standard 2×6 wall frames without requiring any additional cutting or drilling.
5: Elbows
Lastly, elbows are necessary as they allow you to make turns in your piping while still keeping it within regulations regarding maximum run length and number of turns permitted per run length.
How to Vent a Tankless Water Heater
Having hot water at the turn of a tap is an essential part of daily life. But if you have ever wondered how tankless water heaters work to get that job done, here’s your guide on getting up and running with one! With just a few steps, see how venting your heater can help keep everyone in the home comfortable all year round.
Step: 1 Choose the Right Venting System
When it comes to venting a tankless water heater, there are four main options. These include the direct-vent system, the sidewall-vent system, the power-vent system, and the concentric vent system. Each of these systems has its advantages and disadvantages that should be weighed before making a decision.
- Direct Vent System
The direct-vent system is an economical choice for venting a tankless water heater. This type of system uses two pipes for outside air intake and exhaust. The combustion gases are entirely vented out through the outside wall, eliminating any need for additional ventilation in your home.
- Sidewall Vent System
The sidewall-vent system is another option for venting a tankless water heater but tends to be less common than direct vent solutions. In this setup, exhaust from the unit is routed through one pipe and out an opening in the exterior wall. This type of venting may allow you to save on installation costs while still providing efficient performance from your tankless water heater.
- Power Vent System
The power-vent system provides another option for tankless water heater venting solutions. In this setup, exhaust from the unit is routed through one pipe up an interior chimney flue where it exits at roof level like most traditional gas appliances do today. This type of venting allows for higher efficiency performance from your tankless water heater.
- Concentric Vent System
The concentric vent system is the newest method for tankless water heater venting. This type of system combines both the intake air and exhaust into one double-wall pipe that runs out a side wall. This reduces the amount of piping necessary for installation, simplifying the overall process.
Step: 2 Prepare the Area for Installation
- Identify the Best Location and Adequate Clearances Around the Unit
Identify the ideal location for the tankless water heater, taking into consideration elements such as how close it will be to the water source and how much space you have available in your home. Ensure that there is at least 6 inches of clear space on all sides of the unit, as well as 18 inches of clearance above it and 24 inches of clearance below it.
- Make Sure to Have Power Source In the Area For Unit
Make sure you have access to electricity in the area you plan to install the tankless water heater and be aware that a gas line may also need to be installed if your unit requires natural gas. If necessary, hire a professional contractor to assist with these tasks.
Step 3: Install Hot and Cold Water Connections
- Use Standardize Pipe Fittings and Washers During Installation
Install piping from your home’s existing hot and cold water supply lines to your tankless water heater by local regulations and manufacturer instructions. Use standardized pipe fittings, washers, and sealants during installation for optimal performance and leak prevention.
- Securely Attach Pipes to Avoid Leaks and Ensure Proper Flow
Securely attach all pipes to avoid any potential leaks or blockages that could lead to restricted water flow and improper operation of the unit. Be sure to exercise caution when dealing with pressurized systems or when working around open flame sources such as natural gas lines or electrical wiring for electric models of tankless water heaters.
Step 4: Connect the Exhaust Flue and Intake Pipe
- Measure and Cut Exhaust Flue Tubing for the Correct Length
Begin by measuring the lengths of exhaust flue tubing needed to properly vent your tankless water heater. You’ll need to measure from the unit to any window or wall openings you plan to use for ventilation. Be sure to take into account obstacles that may affect the length of tubing required, such as walls or furniture. Mark the measurements directly onto the flue tubing before cutting it accordingly with a hacksaw or tube cutter.
- Place Pipe Connectors on Tubing Ends and Securely Attach them to Unit
Once the pieces have been cut to size, attach pipe connectors on each end of each piece of tubing and firmly secure them onto the unit itself. Depending on your model, these pipe connectors may be screwed in directly, or they may need to be secured using a special adhesive sealant or putty.
Step 5: Verify the Proper Operation of the System
- Check for Any Leaks or Blockages in the Piping
Thoroughly inspect all connections and make sure that there are no leaks or blockages in any of the piping throughout the system. To do this, look for obvious signs such as damp spots along pipes, or check for air leaks around connected pieces with a smoke tester.
- Test the Unit’s Functions at Regular Intervals to Ensure Its Efficiency
After you have verified that all connections are secure and functioning properly, test out your tankless water heater’s functions at regular intervals throughout its lifetime to ensure its continued efficiency and proper operation. Check for water heat levels, pressure settings, and other indicators regularly so you can spot any potential problems before they become larger issues down the line.
Troubleshooting Common Issues With Tankless Water Heaters
Are you having trouble with your tankless water heater? Let’s figure out what might be going wrong and get back to worry-free hot showers in no time.
1: Poor Performance Due to Airflow Blockage or Corrosion
If the airflow is blocked or there has been a buildup of corrosion on the tankless water heater, it can cause a decrease in performance. This is because the combustion process requires a certain amount of oxygen for proper operation and when the airflow is blocked or there is corrosion, the flow rate can be reduced substantially.
To troubleshoot this issue, ensure that any vents or air ducts are clear of any obstructions and check for signs of corrosion on the unit itself. Additionally, it may be worth considering replacing old parts with new components that are designed to resist corrosion.
2: Improper Combustion Due to Lack of Air Supply
Poor combustion due to inadequate air supply can be caused because the water heater was not properly installed or because there have been changes in its environment such as too little ventilation.
To resolve this problem, check that all vents and air passages are clear and make sure that there is adequate ventilation in the area. If needed, adjustments should be made to ensure an adequate supply of air for proper combustion; this could involve adding additional venting, adjusting the fan speed, or installing an outside vent if necessary.
3: Problems With Carbon Monoxide Emissions
Many tankless water heaters use natural gas for fuel which means they produce carbon monoxide as part of their normal operation. Carbon monoxide can be dangerous if not properly managed as it is odorless and colorless making it difficult to detect without specialized equipment.
To prevent potential health risks from carbon monoxide exposure, it is important to regularly have your tankless water heater inspected by a professional who will use specialized equipment to test for carbon monoxide emissions levels above safety standards; if elevated levels are found then appropriate measures should be taken such as repairs or replacement parts installation to ensure safe operations going forward.
Frequently Asked Questions
There are two methods by that tankless water heaters can be vented: power-vent or direct-vent. Power-vent appliances simply vent the exhaust outside while using interior air for burning. Direct-vent systems feature two vents for intake and exhaust since they draw air in from the outside.
No, tankless water heaters require larger diameter pipes and specialized venting parts which cannot be used with existing vents. Consult a professional to ensure that the proper sizing and type of vent are used for your tankless water heater installation.
The exact venting distance depends on the type of tankless water heater and the diameter of the vent pipe. A professional should be consulted to ensure that all local codes are met and the tankless water heater is installed properly.
No, tankless water heaters require specialized venting materials such as metal pipes or stainless steel. PVC is not suitable for tankless water heater venting. Venting a tankless water heater doesn’t have to be a hassle; with the right knowledge and tools, you can get back to hot showers in no time. Just remember to consult a professional installer for the best results and safety.
Yes, tankless water heaters need an adequate supply of fresh air for proper combustion. If you are having problems with your tankless water heater, it may be due to a lack of fresh air intake, so make sure to check all vents and ducts for obstructions or corrosion.
A tankless water heater vent typically consists of a pipe extending from the tankless unit to the outside, with specialized parts for venting such as elbows and wall thimbles.
Conclusion
We hope you found this article helpful in determining how to vent a tankless water heater. Venting a tankless water heater is an important part of its installation process and should be done by a professional. Make sure to check the vents and air passages for obstructions, use only specialized venting materials such as metal pipes or stainless steel, and ensure that the supply of fresh air is sufficient for proper combustion. Regularly inspect the tankless water heater for elevated levels of carbon monoxide emissions, as well as any other potential safety issues. With this knowledge in hand, you’ll be back to hot showers in no time!
Ella John is passionate about helping her readers make the best choice when purchasing a heater. She understands that selecting a heater can be difficult and strives to provide information to help make the decision easier. Ella’s website, Heatersinfo.com, provides valuable insight into heating trends and types of heaters and tips on how to care for them. She also advises selecting the right heater based on individual needs and preferences. Her expertise in electronics makes her an excellent source of knowledge, and she is confident that anyone who visits her website will find the perfect heater information for their needs. Ella’s dedication to helping others make educated decisions about buying the right heater is unparalleled, and she hopes to continue offering her expertise for many years. With Ella’s help, finding the perfect heater can be a breeze!

